Now that the Nook Glow has been released, development is already underway to get it rooted just like the original Nook Simple Touch.
But the #1 most important thing to do before rooting or experimenting with any hacking is to create a backup so that you can restore your Nook Glow or Nook Touch to a previous state in case something goes wrong or if you want to unroot your Nook.
Luckily, the method for backing up and restoring the original Nook Touch works just the same on the Nook Glow. I followed the directions at XDA and had a backup in a matter of minutes. The directions are for advanced users that are already familiar with certain steps so I thought I would go ahead and put together step-by-step directions below.
These backup and restore directions are specifically for Windows, but you can find directions for Mac and Linux on the original backup and restore thread at XDA.
What you will need
Physical Items
Nook Touch or Nook Glow
MicroSD card
USB cable
SD card reader
Windows computer
Software
You’ll need to download and install these three free programs on your Windows computer:
Noogie.img
Another thing you will need to create backups and to restore is the noogie.img file:
Step #1: Create Noogie MicroSD Card
We need to write the noogie image downloaded above to a microSD card.
1. Download the noogie.img.gz file to your computer and then extract it.
2. Plug a blank microSD card into your computer. If your computer doesn’t have a card reader built-in you will need an sd card reader (don’t use your Nook!).
2. Open WinImage. Select Disk > Restore Virtual Hard Disk image on physical drive… Select the microSD card from the list and hit OK. Now locate and select the noogie.img file to open (make sure to select “All files” from the drop-down list to get img files to show up). After hitting Yes, WinImage will write noogie to the microSD card.
Step #2: How to Make a Backup
1. Power off your Nook Glow/Nook Touch (off, not sleep).
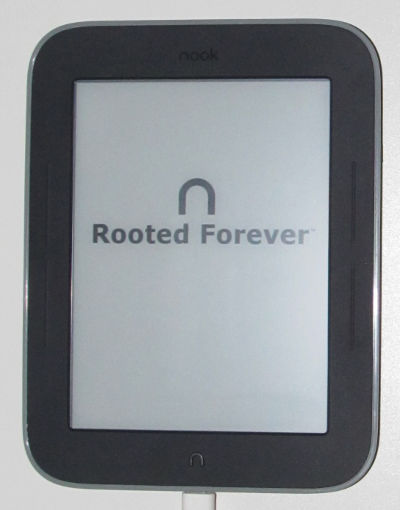
2. Insert the noogie microSD card and power on. You should see a “rooted forever” screen like the one at the top of this post (don’t worry, your Nook isn’t really rooted yet).
3. Plug your Nook into your computer with the USB cable.
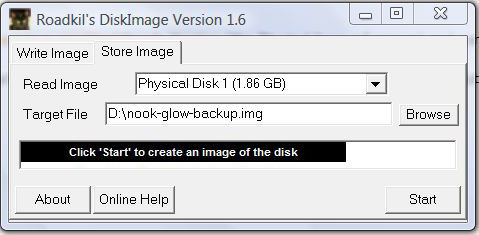
4. Open Roadkil’s DiskImage software. Make sure to select the “Store Image” tab. Then choose the Nook Drive from the drop-down list. It is called Physical Drive and should be about 1.82GB for the Nook Touch and 1.86GB for the Nook Glow. Choose a destination to save the file and then hit start to create a backup.
5. After the backup copy has been saved, you can now disconnect your Nook from the computer and remove the noogie microSD card from the Nook. Reboot your Nook and it is back to normal. It can be a little tricky to get it to reboot. Don’t panic. Hold down the power button for several seconds. Sometimes it takes several times of holding down the button to get it to restart.
Now that you’ve got a backup, it’s safe to start rooting and modding your Nook. Hit the Nook Touch Rooting Guide for the complete walkthrough and video. Those directions are for the Nook Touch only; the Nook Glow doesn’t have a rooting package yet. I’ll post directions when it does. Subscribe to keep updated.
How to Restore Nook Glow/Nook Touch
1. Power off your Nook Glow/Nook Touch.
2. Insert the noogie microSD card and power on.
3. Plug your Nook into your computer with the USB cable.
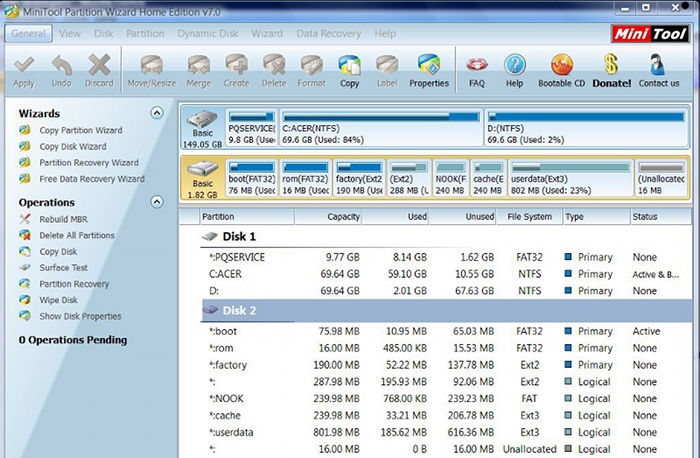
4. Open MiniTool Partition Wizard. Select the Nook Drive. Make sure to select the right drive! Then right-click the Nook Drive and select “Delete All Partitions”. Again, make double-sure you selected the right drive; it will be under 2GB. After confirming, you will then have to hit “Apply” in the upper left corner to make the delete official.
5. To restore, open Roadkil’s DiskImage software. Use the “Write Image” tab this time and select the Nook Drive from the drop-down list. Select the source file, the backup image you created earlier, and hit start to restore.
6. When the restore is finished, you can disconnect your Nook from the computer and remove the noogie microSD card and reboot.
how could i get my card back ??
Format it. I use a free program called SD formatter.
“To restore, open Roadkil’s DiskImage software. Use the “Write Image” tab this time and select the Nook Drive from the drop-down list. Select the source file, the backup image you created earlier, and hit start to restore. ”
Unfortunately this is not possible because Roadkill just reports “Drive not ready”.
Help. I’m trying to restore to my Nook Glowlight after rooting with tinynoot. When I opened MiniTool Partition Wizard in step 4 I only see two drives Nook (240mb) and boot (76 mb). So when I delete these and then trying to restore my 1.86gb backup file with roadkill’s discimage it only shows the 240mb and 76 partitions and when I try to restore I get “Error #5 occured while writing the disk at sector 0.”
I think it’s the size of the partitions that’s the issue but I can’t seem to figure it out.
Nevermind, I misread a step and didn’t write the noogie image correctly. All good.
To get the SD card back to normal, you can format it using the Nook Simple Touch and it will wipe any partitions. It’s in Settings > Device Info > SD Card then Unmount and Format.
Is that a clean noogie file? When I try to extract it (via PeaZip) I get a “Fatal Error.” It looked okay so I tried to write it. WinImage got to about 96% and quit (couldn’t read), win32diskimager wrote it but my nook doesn’t turn on with the card installed. It does once I pull it out. Any thoughts?
I am getting the same problems with the noogie file. Any idea why? I’ve tried extracting it with gunzip and 7-zip. The noogie.img.gz doesn’t seem to work.
Quote:
“Noogie.img
Another thing you will need to create backups and to restore is the noogie.img file:
noogie.img.gz”
This file is corrupted and it is not working..
The Noogie file is now working again everyone. I used a version I had from a while ago that I know for sure it works because I just tested it (extracted with WinRar). Sorry for the confusion.
Hi, thanks so much for all this, but I have a question, in step 2, when it says “Open WinImage. Select Disk > Restore Virtual Hard Disk image on physical drive… Select the microSD card from the list and hit OK.” There is nothing to select in the little window on display, no microSD card, nothing…… what do I do?
@Soledad: Try running WinImage in Admin mode 😉
So great ! I haven’t rooted anything before because I’m not good at computer. I hope it work for me this time. I have a question:
I bought a 16GB microSD card. Can I use it for this work?
And after back up and root my nook, can I use this card for storing some book or my data?
Can i make the backup on the mSD card and copy the hole content to PC for using same MicroSD card with nook?
No idea what you mean.
Can you create a backup and root from the same micro sd card?
Does anyone have their NSTG backup image handy? Mine got corrupted and I’d like to go back to stock.
Since each has the user’s information on it, that’s probably not going to happen. But I think I remember seeing an original unmodified image somewhere at XDA; I can’t find it now though. Here’s an old restore method but it was for the regular Nook Touch. You might be able to find the Glow image somewhere in the referenced XDA thread.
Sorry, I hope this isn’t a silly question. I’m trying to make a backup of my glow nook. I’m trying to create a noogie micro sd card. I’m getting an error “error reading file c: c:\Users\Heather\Downloads\noogie.img.gz”
It stops at 49 percent of my 2 gb sd card. I read somewhere that someone downloaded 7-zip. So I downloaded it and I can extract the gz, but I still can’t write noogie to the sd card. I’m just wondering what I’m missing???
Thank you 🙂
Heather
Thanks for the guide, but I seem to be stuck.
1. Launched WinImage
2. Selected “Restore Virtual Hard Disk image on physical drive”
3. Selected my microSD card
4. Selected the “noogie.img”
5. Hit “Yes” when asked about writing to my SD card.
6. Get the message “Error in writing disk. The process cannot access the file because it is being used by another process.”
I’ve tried restarting my computer, but I always get the same error no matter what I try.
I’ve experienced similar issues in the past but restarting usually fixes it. Perhaps your computer’s anti-virus software is interfering somehow.
You don’t have to reboot, just hit ctrl+alt+del, start the task manager and close the process on the micro sd card. You should then be able to write to the card.
In my case, the microsd card was opened in explorer.exe; So here’s what I did.
1. Launched WinImage
2. Selected “Restore Virtual Hard Disk image on physical drive”
3. Selected my microSD card
4. Selected the image file
then
5. opened task manager and killed explorer.exe
6. using Alt+tab, I switched to winimage
7. clicked Yes in the confirmation dialog
It started restoring it.
Once it started, I felt it’s now ok to re-run explorer, so went to Applications tab in task manager, clicked “new task”, typed “explorer” and hit enter. Hope it helps you or someone else reached here searching for a solution
Interesting, I moved the file “noogie.img” to another folder, closed the folder, and tried again. Apparently this fixed the problem, as I was able to copy the file to my SD card.
Anyone willing to share an img of their original Nook Glowlight content? I bricked mine and found no way to revive it. Any backup of a NSTG would do, thanks.
Remember NSTG runs 1.1.5, so any NST images out there won’t work….
Hey Nathan,
Is there an alternative to backing up the factory fresh Nook GlowTouch?
I find the Noogie method complicated.
Not that I know of.
hello friends
I have a question! please guide me
in step 4 roadkills show me:
Physical Disk 1 (1.82)
Physical Disk 2 (Not Ready)
my nook is glowlight too!
do you know what’s The problem
I selected the option to go to home instead of go launcher and I selected the “do this all the time” option. Is there any way to clear that because now I can’t get to the launcher.
I did that before too and couldn’t figure out how to get it back unfortunately. Had to restore and start over…. You could probably use ADB someway but I don’t know how.
I’ve used your method to backup, but I am weary of deleting everything from the NST. Is a way to restore it to a USB drive? I did that to my 2GB usb stick, but after restoring, my usb property shows FAT32, 10,244,096 bytes used and 78,445,568 total. I was concerned size was lot less and also I didn’t see partition. Is this normal? the my image file size was 1,958,739,968 bytes. Does this mean it restored ok and it’s safe to do it for real on the NST?
Can I wipe the SD card after I’ve saved the backup on my computer so I can use the SD card for rooting?
Thx, Gabe
I believe that all noogie does is allows it to be backed up. Don’t believe me as I’m about to try it as well, but that’s what I think because the post says after that you can remove the noogie card and start rooting, so it seems like you don’t need the noogie any more.
True, this. After that you can re-format the card and use it like normal. Or you can re-use it to root another device, if that’s what Gabe means.
I really hope so, as I am about to do just that.
I need to restore my Glow to return it because of a defect. When I try to re-write the noogie on my SD card it doesn’t seem to work. Any ideas? I can re-write the clockwork file no problem. Also I assume when I put the noogie file in the already rooted nook it will say “Rooted Forever” when it starts up. Correct?
Can I copy the SD card I copy everything to in order to root another Simple Touch so I can give a rooted reader for Xmas?
Hi,
The dl.dropbox.com site accessed through the noogie.img.nz link above times out when clicked. Any ideas of an alternate site for noogie? Thanks.
It’s working now. Dropbox probably just doesn’t like me using them for this so they stop allowing it to work sometimes. They’ve shut me down in the past for excessive downloads.
I’m trying to create an image for a Nook 1st Edition, not to root, but as a backup. When I save the image from the Nook to my PC, all of the data seems to transfer, and I end up with an .img file on my hard drive. However, the whole process ends with a “Image not created” error.
If I delete my partition and then cannot boot the Nook from this file, will I be have bricked my Nook, or will a system reset avail me? Thanks.
I never messed with modding the 1st edition Nook so I couldn’t say. I would check a website called NookDevs if I were you; they should have info on backing up the Nook.
Yeah, NookDevs appears deadish. My emails to their admin keep bouncing, and no one else has any real contact info. I’ll try their IRC channel next, I suppose. Websites are more in my comfort zone. 🙂
Thanks for the answer.
Hello,
By any chance, do you still have the backup image of the nook simple touch glowlight?
I made a huge mistake while restoring and the backup file has been completely broken. Now I have a nook shows ‘Rooted Forever’.
Any help will be appreciated.
Thanks.
Sorry, John. No can do. My backup has my personal info on it. You should be able to find something at XDA to revert back to stock.
Does it work for firmware 1.2.0?
Backing up does but rooting does not :(.
I’m stuck at trying to create the disk image, I’m at Store Image – found the correct physical disk – chosen a location to save to and named it -, but when I hit start I get “Disk Error: Unable to open disk for reading!” Tried restarting the whole process from the start a few times with the same results. Where am I going wrong?
Are you remembering to right-click and running the program as administrator?
Yep.
I still can’t get this to work, followed the instructions through exactly a few times now. Have somehow managed to go backwards a step, I can’t see the physical disk with 1.86gb in ‘Store Image’ any more.
If I go to my disk management I can see it’s there as ‘Disk 10’ with the boot partition and 7 other partitioned sections.
😕
Any ideas?
I don’t know what the problem could be; I haven’t made a backup in a long time. Is your Nook running the newer 1.2 firmware? If it is then rooting won’t work anyway.
Argh… yes. Software version 1.2.1.
After deleting all partitions, my nook drive isn’t visible anymore so I can’t install my Nook backup. What do I do now?
It had an error at writing at sector 0. Error 21
!!!! DO NOT USE THIS METHOD FOR W7!!!
On backup I thought I’d have a brick. I hade the message “error writing at at sector 0”, save me backup on windows XP.
Use NookManager: Features: Root your nookBackup, RestoreRestore to factory, settingsDisable B & N. AppsCustom plugins
http://forum.xda-developers.com/showthread.php?t=2040351
http://forum.xda-developers.com/showthread.php?t=2071855&highlight=root+nook+simple+touch
I don’t know what you’re talking about. This tutorial was done using Windows 7.
Now that we have CWM for the NookSimpleTouch (as used for GlowNooter), can’t we just use that instead of this method to create & restore Nandroid backups? Would CWM be suitable for creating an initial backup before rooting?
Not sure. Last I knew CWM wasn’t suitable for making backups, but that was a while ago.
Unless I’m mistaken the RC2 release has fixed that issue.
http://forum.xda-developers.com/showthread.php?t=1360994
Hi Nathan. I seemed to have done something wrong and somehow erased the system drive with SDFormatter thinking that the “Android” drive was a different “Android” sdcard that I have hooked up to my computer. Anyway, the Nook Glowlight won’t boot now and it is on the “Rooted Forever” screen and will not boot up. Fortunately, I have a image backup, but I get an error message when I try to restore using Roadkil’s Diskimage software and the Nookie memory card. Any suggestions?
Hi Nathan. Too elaborate…the error message I am getting with Roadkil’s Diskimage software when I am trying to restore the image is “Error #0 occurred while while writing to disk at sector 3907328”. Any reason for this error?
This is at 99.95% completion.
Sorry but I never experienced that issue so I have no idea.
In case anyone else runs into my “Error #0 occurred while while writing to disk at sector 3907328″ message when restoring a backed up image with Roadkil’s Diskimage this is due to not hitting the “Apply” button in the Mini Tool Partition Wizard program after you “Delete All Partitions.” Initially, I did not hit the “Apply” button since under the Mini Tool program my sdcard showed up as having no partitions to begin with, but it turns out you must still delete and hit apply for Roadkil’s Diskimage to work on your micro sd card. Hope this helps someone.
hi, i’m trying to write the image on the micro sd card, but i get error 5: access is denied
Hi everyone,
I’ve followed this tutorial:
“How to Restore Nook Glow/Nook Touch
1. Power off your Nook Glow/Nook Touch.
2. Insert the noogie microSD card and power on.
3. Plug your Nook into your computer with the USB cable.
4. Open MiniTool Partition Wizard. Select the Nook Drive. Make sure to select the right drive! Then right-click the Nook Drive and select “Delete All Partitions”. Again, make double-sure you selected the right drive; it will be under 2GB. After confirming, you will then have to hit “Apply” in the upper left corner to make the delete official.
Untill this point it’s all ok. I’ve deleted all the partition. But now, at point 5…Roadkill’s DiskImage doesn’t see nothing. Also my PC doesn’t see anymore the nook as external device…
So, now I cannot do anything with the nook.
I can I do to see the nook as external device once connected with the USB cable?
The last step doesnt work . i deleted all my partitions and when I “write the program” on the nook drive…. I “turn on” the nook and NOTHING happens :S It’s wrong. I need help! my nook got brick and I dont know what to do, I’m so sad!! )=
on windows 7, this method does not make a proper backup. it makes a one quarter backup that is unusable. my nook got bricked also… look at my thread on xda for solutions how to solve it:
http://forum.xda-developers.com/showthread.php?p=47976136
first thing to do is make a proper backup of your bricked nook(even if it’s bricked, you need to make a backup before recovering your bricked nook, if something goes wrong with recovery you can still revert back) .. look in my thread on the method i used to do a backup
Funny, I’ve used this method repeatedly with both the Nook Touch and Nook Glow using Windows 7 without any issues whatsoever…
In Linux, using Ubuntu ImageWriter.
In looking into the Nook file, all I find is .adobe-digital-editions, LOST.DIR, My Files, screensavers (all folders) and .devicesalt (file).
So, I can’t find Physical Drive (looked in all the above mentioned folders, it wasn’t there). Any suggestions?
I have a rooted Nook STwGL (ZeroLab root) with a bunch of programms installed and set. I’d like to do a backup of it. If I reboot with the noogie SD, will it erase my root and all the custom software?
I stopped at the step number 1. I cannot create a noogie microsd card. I complete the step as described above but when i put the sd card into my nook and turn it on nothing happen. I mean “read forever” not rooted forever shows up on the screen. DO you have any ideas what is going wrong?
Hey, I want to backup my nook so I can root it with no danger, but I have windows 8 and winimage is not avaliable for my windows. Do you have any alternatives for winimage??
thank you.
-Carla
I’ve heard of people using a program called Win32DiskImager.
If you use “NookManager” and at least a 2GB MicroSD care, you have the option to backup to the SD card before rooting. You boot from the MicroSD card and then do the backup. Because you have to boot from the “NookManager” SD card to backup or restore you don’t have to root with NookManager to use this method.
If you use Windows 7 you need to Lock the Nook device with LockDismount 0300 otherwise Roadkil’s Disk Image won’t work.
Based Alexis. Your method worked like a charm on W8.1
You can find LockDismount v0.3.0.0 at:
http://reboot.pro/topic/12413-lockdismount-v0300-update/
I have lost the backup can you give me yours?
plz somebody help me
Sorry, but nobody around here is going to give you a backup because it has personal information on it. You can get a new Nook Touch for practically nothing nowadays. Office Max has them on clearance for $35.
You can get your Nook back by using the NookManager “Restore factory.zip” function.
Hi & thank you for the guide.
I actually came upon your guide after encountering an issue with the instructions on the original xda thread you link to.
But the thing is, now I have an issue here too, at the very beginning.
In WinImage, when I’m supposed to “Select Disk > Restore Virtual Hard Disk image on physical drive… [and then] Select the microSD card from the list and hit OK” – Nothing at all appears on the list. I’m using a ScanDisk 8GB MicroSD Class 4 with my PC’s built-in MicroSD reader. My PC is a Windows 8.1 Pro 64bit Tablet-PC (Cintiq Companion by Wacom if you’re familiar with it). And I’m using WinImage 6490 (64bit) from the unzipped “wima6490.zip” file downloaded from the site you link above for WinImage.
Any ideas on how to fix this?
Please help.
And thank you 🙂
-Mike
Have you tried right-clicking and choosing to run the program as administrator?